Archive for the ‘Kitchen organizing’ Category

Achieve Your Home Organizing Goals in 2025

Posted by

Organized and modern home office and craft area

The start of a new year often inspires a desire to refresh our lives and spaces. For many, this means tackling home organization, downsizing, or decluttering projects. While the idea of a perfectly organized home is enticing, the process can feel overwhelming without the right tools and strategies. In 2025, partnering with a qualified professional organizer can be the key to transforming your space and simplifying your life.

Why Consider a Professional Organizer?

A professional organizer brings expertise, efficiency, and an objective perspective to your organizing goals. They understand that life in the Bay Area, where we are based, often comes with unique challenges, from limited space to juggling the demands of work, family, and personal time.

Whether you need help downsizing for a move, organizing a cluttered garage, or streamlining your kitchen, our skilled team of organizers will tailor solutions to your specific needs. We offer strategies to maximize your space, systems to maintain order, and even emotional support as you part with items that no longer serve you.

How to Work with a Professional Organizer

  1. Set Clear Goals: Before your first session, identify what you want to achieve. Are you looking to create a minimalist aesthetic, improve functionality, or prepare your home for a new chapter? Sharing your vision helps us craft a personalized plan.
  2. Start Small: Begin with one area, such as a closet or home office. Completing a smaller project builds momentum and confidence for larger tasks.
  3. Be Open-Minded: We often suggest innovative ideas you might not have considered, such as modular storage solutions or digital decluttering techniques.
  4. Focus on Sustainability: With 16 years of experience, we will emphasize sustainable practices, like donating items to local charities or recycling responsibly, aligning with the eco-conscious values of many Bay Area residents.

Benefits Beyond the Clutter

The benefits of working with any professional organizer, us included, extend beyond a tidy home. You’ll gain peace of mind, save time, and create a space that supports your lifestyle. A well-organized home reduces stress, enhances productivity, and allows you to focus on what truly matters in 2025.

If you’re ready to achieve your organizing goals, we are eager to help. Reach out today by scheduling a free, no obligation discovery call and take the first step toward transforming your space—and your life!


How Lis Helped Me Declutter My Dishes in 90 Minutes

Posted by

Editor’s Note: Cara Lanz is a freelance writer, digital marketer, and self-proclaimed word nerd. She is also a god-send to me.  This month she is my guest blogger. When she isn’t creating digital content for clients across the country, she is blogging on MidwesternHomeLife, her own lifestyle website. She loves to share simple and (sometimes) healthy recipes, debt-free tips, and inspiration for creating a happy home in the heartland. You can find Cara at https://midwesternhomelife.com/. 

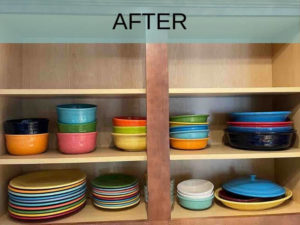
I knew I needed to declutter my dishes when it came down to a math problem I just couldn’t solve. I had two people in the house and a dinnerware cabinet brimming with — among other things — 21 dinner plates, 12 salad plates, 17 saucers, and 20 soup bowls. 

Now, in my defense, they were all matching– well, as matching as Fiestaware can be — and neatly organized. No haphazard piles or plastic containers shoved in there. So, on its face, it didn’t really appear as though I needed to declutter my dishes. 

But the math just didn’t work. Plus, I had other cabinets bursting at the seams with things I wanted to move into my dinnerware cabinet. 

How would I go about deciding what to keep and what to get rid of? 

Enter Lis McKinley, owner of LET’S MAKE ROOM. As an organizational expert, she’s helped hundreds of others figure this very thing out. 

But, I wondered: Would she finally be the one to pry my superfluous Fiestaware from my gripped fingers, or would I be the one and only person she has not been able to help? I really had no idea which way this was going to go. 

So we set up a Zoom meeting. 

My Virtual Organizing Call with Lis

When I first got on a call with Lis, I noticed two things right away. She’s warm and welcoming and made every crazy organizational dilemma I had seem like it was totally normal, and she’s heard it a million times. She’s also extremely decisive in that teacher kind of way that just made me want to do what she said because I knew she knew what she was talking about. 

She laid out our plan for exactly what we were going to do during our time together. She even had a clever acronym for her process: S.P.A.C.E. She gently took the time to explain what each of the steps meant and made sure I understood them. 

For the next hour, we: 

Sorted

Purged

Assigned

Contained

Equalized

Here’s what that looked like. 

Sort

To get started, I pulled all my dishes out of the cabinet and put them into like piles. Bowls with bowls, plates with plates. Not only did this help me to see with clarity exactly what I was dealing with, but it also gave me an empty cabinet, aka, a clean slate, to start all over again. 

Purge

The goal of purging was to make decisions about which items I wanted to keep, based on four criteria: Do I love them, want them, need them, or use them? We had really thoughtful conversations and she asked me things like, “If you saw that in a store, would you buy it again?” We also discussed how often we entertain, how many adults and kids, and which dishes we need to accommodate them. Then we pared down from there. It all made perfect sense. 

We also sifted through things that I knew just weren’t going to go back into the cupboard. These super fussy 2-part martini chiller/chilled appetizer glasses, for example. Also, some heirloom dishes that are pretty enough, but I’m just not using them. 

Assign

During the assign process, I had to find a home for everything. To figure that out, I had to think about where I would most likely look for things if I needed to use them. So a good amount of my dinnerware was assigned back to the cupboard. 

Those fussy 2-part glasses — and other things I’ll never use again — went straight into the “Donate” box. The heirloom dishes went into my “Ask Mom If She Wants Them Back” box. But that wasn’t the end of it. Lis made me pick a date when I would drop off the “Donate” items and send a pic to my mom of the items that were potentially going to boomerang back to her. So, now I was accountable. But, it was all on a timeline that I chose. 

Contain

Now it was time to put things back. Contain my pared-down dishes into the cupboard. But it wasn’t just, “Okay now put everything back.” Lis asked me to think about each item I was putting back and where it would be best to put it. We had discussions about things like, “Well, we really use these bowls more than those bowls,” and “I can’t reach those plates very well when the dishwasher is open.” So it was super strategic, and I could tell it was going to set me up for long-term success. 

Also, Lis knew one of my goals was to get rid of so much stuff in this cupboard that I could free up my entire top shelf, drop it down to a level I could actually reach, and transport items I use all the time from another hard-to-reach cupboard. So while Lis sat in the Zoom room, I hauled over a bar stool, climbed up on my counter, and dropped down that top shelf. Just like that, that cupboard became 33.33% more useful to me!

Equalize

During the equalize phase — this was the tidying up at the end of it all — I easily put things back where they belonged. Lis explained that the process of assigning and containing is what makes it possible to equalize, because I had already established a home for everything. 

I had a pile of plates and bowls that were going to be put away into my pantry for when I needed them for a large party. I had certain dishes I only use for my food blog that needed to go where those things live. At last, everything was where it should be. 

My Dishes, Decluttered

By the end of our hour and a half together, my cupboard was whittled down to a svelte 10 dinner plates, 10 salad plates, and 10 soup bowls. Zero saucers. Lots of room for everything we need, in the places that make the most sense. AND a completely empty shelf ready to take on the overflow when I use the S.P.A.C.E. method to clear out my next cupboard. 

Make your pantry user-friendly: A homebound guide

Posted by

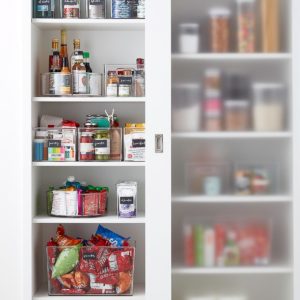
Organized Pantry and Bins

If pantries were so easy to keep organized, groceries and supermarkets wouldn’t have to tidy and restock their shelves every day!

When it comes to organizing your pantry, if you don’t have time to empty boxes of cereal, rice, or mixed nuts into their own individual glass jars and put a pretty label on it–and who does?–then this is the perfect pantry organizing solution for you.  Here’s how it works:

  1. Start by emptying your pantry and group all like-items together such as:

candy, chips, snacks, crackers, cereal, dried fruit, nuts, rice, grains, pasta, lentils, canned items, dried spices, baking supplies, bread crumbs, broths, stocks, non-refrigerated milks (almond, coconut, soy), oils, vinegars, cooking sauces, nut butters, jams, jarred items, etc.

  1. Use larger containers, like hard plastic food storage bins designed for cabinets, to segregate different categories of items in their original packages. This keeps them from migrating to other areas. Hard plastic bins can easily be washed and, best of all, you can pull them out easily to get what you need without having to go searching for the right item.
  2. The bins should be deep enough to fit your shelves and wide enough to contain several like-items or several related categories, such as dried fruit and nuts. Check out mDesign bins available from their website, or iDesign bins available from The Container Store.
  3. You may also have to readjust your shelf heights to accommodate taller items like cereal boxes. Check out this video to see how. https://www.youtube.com/watch?v=mTBSpVWmVl0
  4. Even if you have smaller quantities of items, like bulk spices, in re-closable bags or bags that don’t sit upright, they can still be contained in one of these bins so that they don’t fall over into another category.


Contain your food storage clutter and feel more in control

Posted by

Imagine sealing off an entire cabinet in your small kitchen to empty space!

That’s exactly what you do when you dedicate a cabinet to empty food storage containers. They are space-thieves! You know you need some but how many?

Organizing-Food-Storage-Containers

Here’s how to make more room in your kitchen and still have a supply of food storage containers for when you need them:

  1. Start by matching bottoms to tops and tops to bottoms. At most, keep only enough to hold a week’s worth of leftovers.
  2. Keep no more than will fit neatly into one cabinet shelf or one medium sized drawer when they are assembled! TIP: Don’t nest lids or bottoms unless they are all the same size.
  3. Keep a supply of disposable food storage containers (tops and bottoms) in a less frequently used storage area to send family home with leftovers on holidays, like Thanksgiving. Store them with your holiday dishes or supplies.
  4. Recycle any clean, dry plastic food storage container that has the numbers 1, 2, or 3 embedded in the plastic. Toss containers that are warped, stained, smelly, or broken.

If you still are uncomfortable tossing them there may be options for donating to your local community schools, churches, or shelters, but more restrictions are in place during COVID-19.